")

and make something adorable today
Get my free Pacifier Clip Pattern
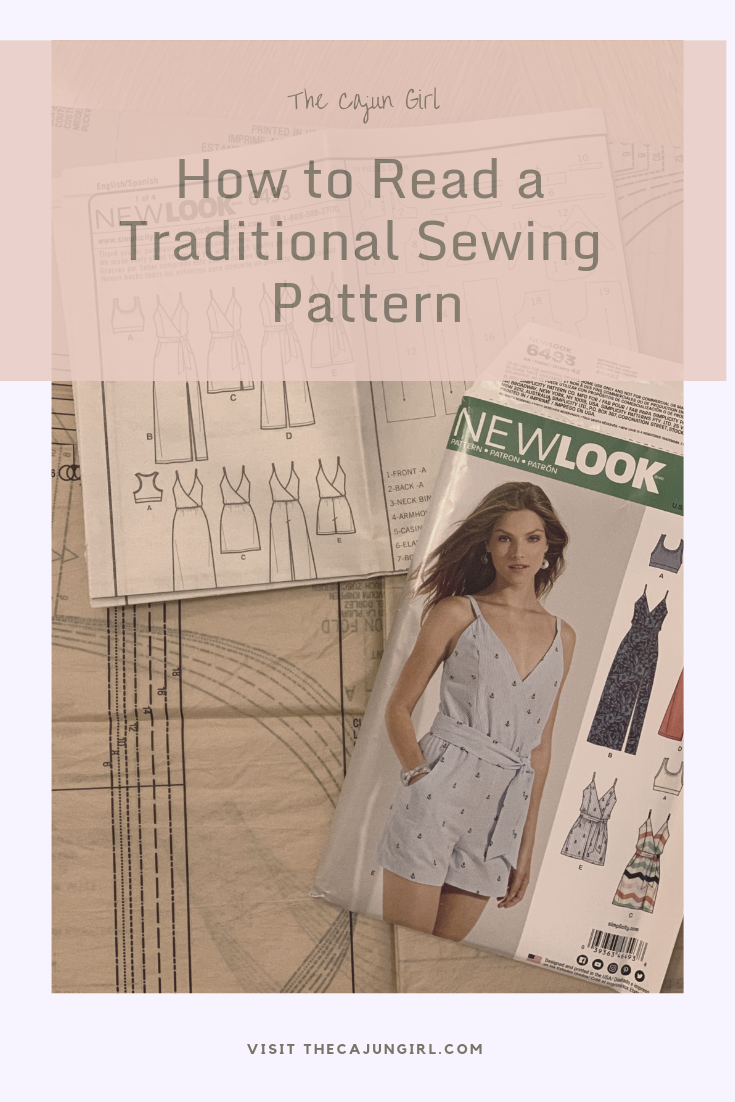
How to Read A Sewing Pattern

Learning to sew is most definitely a labor of love, and most sewing patterns from the big 4 companies (Simplicity, Butterick, Vogue, McCalls) are intimidating! Learning how to read a sewing pattern can be extremely daunting. I learned to sew using patterns with the helpful and watchful eye of my loving grandmother. I can still hear her saying “if you are gonna do something, do it right”.
Since you may not have a mentor to teach you, I am here to help! These sewing patterns contain a ton of valuable information, but what if you don’t know what is means? Well, today, you are in luck. I will provide you with a comprehensive guide of how to read any traditional sewing pattern. When I first began sewing, I made a ton of mistakes. I know the frustration of wasting time correcting those mistakes. And if I’m being honest, I just skipped a lot of the important pieces of information because I didn’t know what they meant (sorry Maw-Maw). I hope that you will avoid the same pitfalls that I have experienced. If you need more information about a specific topic, I will be adding additional posts and links for more in-depth information. This is only information about how to read a traditional paper sewing pattern.

How to read a sewing pattern envelope
All sewing patterns from the major pattern makers come in packages called “envelopes”. The front of the envelope usually contains the following items listed below.
Front of the Envelope

- Pattern number – This number is how the pattern company identifies each specific pattern. The pattern number is typically in the left or right upper corner on the front of the envelope. It is absolutely necessary for large pattern companies to number their patterns because they have literally thousands. This is valuable for you as a consumer because the number is printed everywhere (envelope, inside, pattern pieces). The pattern number is on the every pattern piece contained within the pattern. If you mix up some of your patterns, they can easily be separated by brand and number. They are also easily searchable in google. If you want a particular pattern that is out of print, you can search it. Oftentimes you will find it at second hand dealers like eBay. Score!!
- Sizes – Obviously, this is extremely important information. The pattern sizes are the sizes that you can make from this specific pattern. It is printed on the front of the envelope usually under the pattern number. Be sure that you have your measurement in hand when you head to the fabric shop. I have bought a pattern for my daughter and when I got home realized that I had bought a size 18 mos – 2 when I needed a size 6. UGH!!
- Views – The “views” are the different garment variations that can be made from the pattern. They are the same overall shape with different finishing details and lengths. This is important to note. As you advance in your sewing ability, you will easily be able to add these details to any pattern. Simple variations in the pattern can seem extremely daunting, but they really are not. You can change the hem, add a ruffle, add piping, lengthen or shorten items.
Back of the Envelope

- Number of pattern pieces – On the back of the envelope, in the top upper top left corner, there are the number of pattern pieces that are included with the pattern. This number is the number of pattern pieces to make every variation. You can quickly identify how complicated the pattern will be to sew together if the number is large.
- Pattern number – This is usually printed on the back of the envelope as well. See the above for further description.
- Size Measurements – (Highlighted in purple on picture) The back of the envelope also contains the body size measurements. Keep in mind that this is NOT the finished size of the garment. Ease and seam allowance are added to each pattern piece to allow the garment to be worn comfortably. Basic ease in the hips is about 1.5 – 2.5 inches for adults depending on the fit and fabric. These measurements on the back envelope are intended for the finished garment to be worn comfortably. If the garment was made without ease, the fabric would not give and would rip when you sat down (not cool). What if your measurements don’t fit the standard measurements in hip and waist? What? You are a real person and not a standardized dummy? Make the size according to your largest body measurement. The garment will have to be adjusted in the other areas. That is the beauty of making your own clothes. They should fit your unique body
- Fabric Requirements – (Highlighted in green on picture). This is the amount of fabric that is needed to complete the project using the cutting layout that is in the package instructions. If you have a directional print, you may need more material than the designer suggests. Let me give you an example. Let’s say that you are making a pair of child’s pjs and you picked a lovely unicorn pattern. The intention would be for that pattern to run vertically on the pants. If you use the intended cutting direction, the unicorns would be going horizontally across the body. Yikes! In this case, you will have to buy additional fabric to account for fabric pattern.
- Finished Garment Size – (Highlighted in orange on picture) This measurement is the finished size of the garment if sewn with the exact seam allowance that is indicated in the instructions. This should not be used to determine which size to make to fit your body. You should use the size measurement chart to determine which size to make. The difference between the finished garment size and size measurement is called ease. Each pattern piece has added ease to allow the garment to be worn comfortably as I mentioned earlier.
- Suggested Fabrics – (Highlighted in Yellow) This section is extremely important for beginner sewist. This is the pattern maker’s suggestions about the best fabric to choose to complete the project. The designer has thought not only about style, but wearability. An example of this would be a wool material used for a skirt with heavy gathers. Not only is it difficult to sew, but the finished product will not fit well. When you first start sewing, stick to the suggested fabrics until you have more knowledge and then you can branch out or try something different.
- Notions – (Highlighted in Red on picture) This section describes the non fabric materials that are needed to finish the project.
- Thread – One of the first items listed is always thread. I usually recommend choosing a thread that blends best with the fabric. If you have a multi color fabric, choose the predominant color. Using a contrasting thread for topstitching is a great way to add a beautiful finished detail to a project. My favorite thread is Guitermann 100% polyester. It is a great thread with little breakage and gives a beautiful finish. It can be used with a variety of fabrics.
- All of the other notions will be listed for each view along with how much you will need to purchase for your project. They include, rick rack, double and single fold bias tape, elastic, buttons, zippers, etc. Be sure to purchase all of the items listed for the view you are making before leaving the store.
Inside the sewing pattern
- There are 2 major items contained inside the envelope – the actual pattern pieces and the instructions on how to sew the pieces together. Let’s take a closer look at each category to learn how to properly read the sewing pattern.

Pattern Pieces
When you first open the envelope, the pattern is considered “factory folded and uncut”. This means that is unused. You may see this terminology when buying a pattern secondhand from an online retailer like eBay or Etsy.

Pattern number
- Pattern number – Use this to identify the pattern. In this example the pattern number is 6493. Every manufacturer will decide how to number their pattern line.
Want to trace your pattern pieces? Use tracing paper.
Size information
- Size – The sizes for each piece are listed under the pattern number. In this example, this is the back facing for sizes 8, 12, and 16. You might ask yourself, “Why are all the sizes not together?”. This is a great question. If you place all the facing pieces together, the lines will be difficult to see. By removing every other size, the lines are easier to follow. For garments, the pattern is graded and you will have to follow the line that corresponds to the size that you wish to make. In the above photograph, size 8 is represented by a round dotted line, size 16 is a smooth continuous line, etc. You will notice that this is the same for all the pattern pieces.

Pattern piece number and Piece Identity
- Pattern piece number – Each piece as a unique number. This is used to decide which pattern pieces correspond to the view that you will be making. This information can be found in the pattern instructions.
- Piece Identity – This information will tell you what the piece is that you are cutting. Is a sleeve, facing, pant back? In this example, you will see that piece #12 is the back facing of the garment. It should be used for Views B, C, D, and E.

Notches, Grainlines, and Notions
- How many pieces to cut (circled in red) – The pattern will tell you how many pieces of this particular item to cut and out of what fabric. In this example, the piece is labeled to cut 2 pieces from fabric and cut 2 pieces from interfacing.
- Notches – What are notches? Those are the little triangles found around the outside of the pattern. The notches are there to help you align the pieces when sewing. The center back is always denoted by double notches (2 triangles together). Be sure and mark the notches on each pattern piece when cutting out the pieces.
- Grainline – The long or short double arrowhead is the grainline. This line will help you align the pattern on the fabric to ensure that it is cut out properly. There are 4 grainlines that may be on your pattern piece – horizontal, vertical, on the fold or bias) It is extremely important and should not be overlooked. In this example, this is a bias grainline. I will have a tutorial soon about how to use grainlines to cut out a pattern.
- Dots – The dots on the patterns can be used in various ways. They will be used to align the pieces when sewing. They also are used to start and stop stitching lines, zipper placement, or button placement. Be sure and mark these dots on the wrong side of the fabric.
- “X” – The “x” on a pattern is usually the symbol for button placement. A buttonhole is indicated by what looks like a large “I” on the pattern. Mark these areas on the wrong side of the fabric.
Other Markings
- Hem line, gather, fold, darts – There are often lots of other lines that are on the pattern depending on the complexity of the garment. Each one of these lines usually have a description on the pattern. Mark them all on the wrong side of the fabric using tracing paper or washable pen. If you have a dart, mark the legs with tracing paper and awl punch the point.
Need more help identifying common pattern markings? Download this free printable now!

Instructions
I have separated each section of the first page of the instructions in boxes. Let’s look further into each section as we continue learning how to read a sewing pattern.

Section 1 of instructions – Views
Let’s take a closer look at Section 1 in the above instructions.

- Finished Item – In the top upper left section of the instructions, there is the introduction and the finished item. This is also called the view(s). Some patterns will have only one view. Others will contain several variations of the garment or item. There is a drawn picture of each view from both the front and back. There is again the pattern number and total number of pages included in the instructions. The instructions are usually printed on the front and back.
Section 2 of instructions – Pattern Pieces
Let’s take a closer look at Section 2.

Pattern Pieces
- This section is all about the pattern pieces that are included in the sewing pattern. At the very top, the total number pieces is listed. In this case, this pattern includes 19 pieces.
- Next, there is typically a picture identifying each piece number and the shape of that item.
- The bottom of this section is a list of the piece number followed by the piece name, and then the letter for the view. For example, if I were making View A, which is the knit crop top, I would need to find pieces 1 – 6 in my size in the pattern.
Section 3 of instructions – How to read your sewing pattern

First Prepare your pattern
First, decide which size you need to make. Next, look at the finished lengths for the garments. Measure your body and decide if you need to lengthen or shorten the items. Use the guides on the pattern to either lengthen or shorten the pattern. This is No. 1 and 2 in the above diagram
Study Your Pattern Markings
No. 3 – 9 are on the pattern pieces. Each item gives a brief description of the specific pattern marking. One of the most important items in this section is the seam allowance. In most cases, it is 5/8″ or 1.5 cm.
Cutting Layout
The next section is how to use the cutting layouts. It describes how to place the fabric and the pattern pieces. There are also keys for whether the right or wrong side of the pattern is up and lots of other markings to ensure the pattern pieces are cut correctly. Numbers 10 – 13 represent these items.
Sewing Directions
This section is simply a glossary of the sewing terms used in the pattern. If you have a question about a specific sewing term, look it up. I have been sewing for 20 years and still come across terms or techniques that are new to me. I usually can find the answer on youtube or with a quick google search. If you find a term that you are unsure of, please leave me a comment or send me a question.
Section 4 of Instructions – Cutting Layouts

In this section of the instructions, each view is in its own box. Each box contains the view for that cutting layout. It will also contain the number of the pattern pieces for that view. Often there is also 2 cutting layouts of each view. One is with 45″ wide fabric and the other is 60″ wide fabric. Keep in mind that these layouts assume that the fabric is not directional. There is a key in section 3 to read the diagram. Looking to trace the pattern pieces? Use tracing paper which can be purchased here.
I hope this helps you learn how to read a sewing pattern! In the comments below let me what you have struggled with or need more information about and I will include it!!
Looking for a new sewing machine? Check out my post for beginners.
Leave a Reply

Before you join anything, just try one project.
This Pacifier Clip Pattern is where hundreds of new sewists have started. It’s short. It’s sweet. And it’ll give you that first “I did it!” moment.
It includes:
A printable pattern you can cut and use right away
A detailed supply list (no guesswork)
Step-by-step instructions with photos
A clear win to boost your confidence
Grab the Freebie That Starts It All


I have a vintage pattern that instructs me to “sew under 1/2 inch”
What is meant by that?
That just implies to sew the raw edge under 1/2″. You can serger or secure the raw edge if one is there.